Showing posts with label Science. Show all posts

Monday, April 30, 2012

Just call me...

The once a month blogger!  I had to get posted before May 1st.  That's right, MAY!!!  Anyway, here is a big ole pot of random for ya...

My End of the Year Classroom awards on TPT have been updated.  I added some new awards and took off the year, so you can use them again and again.  Click the pic to get your awards.

Moving on...
Our curriculum map had us doing plants FOR...EVER...  So I tried to come up with something fun for the kiddos to do with plants.  Here is a little poem I wrote and some Instagram/PicFrame pictures from when we did the activity...

This is what I used for 20 students:
2 large packages of shredded lettuce
1 package of shredded carrots
1 pack of cherry tomatoes
1 bottle of ranch dressing
20 bowls
20 forks
4 spoons (for ranch)
4 cups (for ranch)
4 plates  (to put the "plants" on)

My firsties LOVED it!!!


Finally, The Lorax stuff.   I know, I know.  I'm totally behind on the times, but maybe you can use it next year, or maybe your have an interdependence lesson coming up, and your kids loved The Lorax so much, you've just got to revisit it.  

We got to go to the movies to see Dr. Seuss' The Lorax after reading the book.  We worked it into our Science and Social studies standards.  This is what our first grade display looks like now that we are all finished:
The students created their very own Thneeds and wrote an advertisement to get people to buy them.

We also did a lesson on interdependence using The Lorax...
 And compared Truffula Trees to Real Trees...
Click {here} to get all the freebies.

I am hoping that this up coming school year I will be on the blogging track, and will no longer be a once a month blogger.  We are on that downhill slope to summer vacation!  How many days do you have left?

Thursday, September 29, 2011

Science Week- Day 4 ~Activities and Experiments~

We have been learning about properties and how they can be changed by heating and cooling.  Last week we changed old crayons by melting them.
Now ours were nowhere near as cute as the beauties from Holding the World in a Paper Cup, but the kids had a blast making them anyway.  Students chose five different colors and put them in foil cupcake liners.  Then they placed them in an electric skillet.  So sorry there are no pictures, but when heat is involved that is the last thing on my mind!


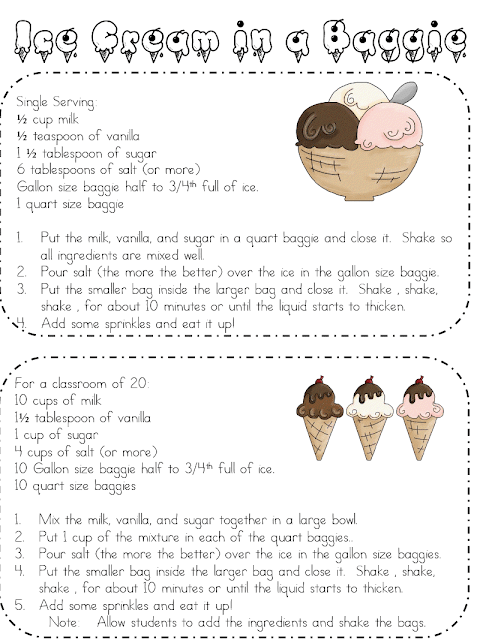
Tomorrow we will be changing the properties of a liquid by cooling it.  That means we are making ice cream!!  If you click the image below, you will get the instructions for making baggie ice cream and a little writing mat that goes with it.

Check out all the other Science activities and experiments at Learning with Mrs. Parker!

Wednesday, September 28, 2011

Science Week- Day 3 ~Freebies!~

My science freebie is to help students get acquainted with science tools and their uses.  I created these sheets to be used as a log for students as they rotate through various science tools stations.  In the document you will find station signs, teacher instructions, an explanation for each station and recording sheets.   Click the pic to get it!


 Here are a few pictures of our stations in action.  I missed out on a picture of the timer area :(. 


 Don't forget to check out all the other freebies at TBA!!!

Tuesday, September 27, 2011

Science Week- Day 2

Tuesday of Science Week is links to your favorite science videos and websites. My favorite is Sid the Science Kid!  Click the image to visit his PBS site.

On his website you will find experiments, videos, songs, and more. This is one of my favorite Sid videos.  It explains how germs are spread!


Click {HERE} to head over to Teaching Blog Addict to check out all the Science websites and videos!

Monday, September 26, 2011

I'm Back and It's Science Week!!!

      I am so excited to be back and blogging after my 2 month hiatus! Thank you to the sweet bloggers who nominated me as one of their Top 10 Blogs or a Versatile Blogger. I love you all! You are dabomb.com!
Everyone be sure to check out their blogs at:
Saylor’s Log
Spotlight on Kindergarten
Smiles, Crayons, and Endless Stories
Simply 2nd Resources
First Grade Fever
Primary Inspired
They are all totally awesome!

You know what else is awesome?  SCIENCE!  I LOVE science and LOVE teaching it.  The wonderful Jennifer from Rowdy in First Grade had the fab idea to put together "Science Week" through TBA. 

Books I LOVE to use in Science are mostly Eric Carle of course! So far this year we have used…

Used more as a relationship builder but we did talk about camouflage.

Used during our weather unit.


Used to discuss properties and attributes of things we are observing.
 Later in the year, we will use.....


 Both for objects in the sky.

Mr. Carle certainly comes in handy during insect and spider studies with The Very Quiet Cricket, The Very Lonely Firefly, The Very Clumsy Click Beetle and The Very Busy Spider.  Oh and how could I forget his legendary life cycle story of The Very Hungry Caterpillar?!?!  I<3 Eric Carle.:)

Check all the other great science books out HERE!

Saturday, February 19, 2011

The Moon #4

Moon Craters 

         After snow days, and 100 days, and Valentine's Day, we were finally able to finish our moon unit.  Our last moon project was to make our own moon craters.  First, we made moon sand with craft sand, cornstarch, and water.


         Then the students used "space rocks," "asteroids," or "space debris" to hit their moon and create craters.   (Like our leftover plates from our party?:))


They drew pictures of what the craters looked like after they threw the different objects.  Click the picture below to get the recording sheet.  

    The one thing that we did not get done that I had hoped to was a moon writing.  Here is the writing mat I made.  I guess I will have it for next year. 


Sunday, February 6, 2011

The Moon # 3

Phases of the Moon

        After learning that we can only see the part of the Moon that the Sun is shining on, the students created models of the Moon's Phases.
     The first model we did was a guided activity using black construction paper and white circles.

Instructions for guided moon phases activity.


            The second model the students did was done in groups of two with very little guidance from me.  They had to draw the Earth in the middle of their plate and then make Oreos look like the different phases of the Moon and put them in the correct order around the Earth.  As the students completed the models  they had to tell me about them.  I graded them according to a rubric.


The Moon # 2

Earth, Moon, and Sun

              First,  we watched this short animation that I found on Youtube.


        To help the students understand the size and position of the Earth, Moon, and Sun, the students became these three space objects.   The majority of the students pushed their desks together, climbed on top and held a sun made out of butcher paper.


         Next, three students held a butcher paper Earth, and two students held a construction paper moon and began to orbit the Earth.  Then the Earth and the Moon students began to orbit the Sun.


         This was so much fun and the students really began to understand how these three space objects work together! 

Here are some of the questions I asked after this activity.
-  Why are there more people in the sun?
-  Why didn't they move?
-  When the moon is between the Sun and the Earth, what phase of the moon do you think this is?
-  When the moon is to the side of the Earth, how does that look to us here on Earth?

The Moon #1

We started our Moon unit with a KWL chart.  The students wrote what they know and what they want to know about the moon.  As we worked through the unit we filled in the "L" with what we have learned and checked off the questions under the "W" as we answered them.  We are still is doing this unit so our KWL chart is still in the works.

We use BrainPopJr.com, NASA kids, Youtube, and many books to learn more about the moon.   These are some of the books we read. 


Monday, January 17, 2011

Cooperative Learning with a STEM Lesson

      This is an example of a STEM (Science Technology Engineering and Math) lesson that is done as a part of inquiry based learning at our school.  We try to get one of these projects done for every science unit we cover.  The one that I am posting as an example was a lesson that was done with  the force and motion/push and pull unit.  We follow a simplistic version of the engineering process.
      Throughout this process the students work in cooperative learning groups.  Each member of the group has a special job that he or she does during the engineering process.  To get the labels and descriptions for the cooperative learning group jobs, click this link:  Cooperative Learning Labels.

     In the "Imagine" stage, we go through a PowerPoint explain to the students what the project will require them to do. Click this link to view the PowerPoint Presentation I made for the push and pull unit:  Ramps: Forces and Motion ppt. If you would like the PowerPoint with working animations, just email me!  After the PowerPoint, the students break into their cooperative learning groups and the scribe of the group draws, with input from the group, what the final result will look like.
 
     In the "Plan" stage, again with input from the group, the scribe will  list all the materials that the group will need to complete the project.  The materials manager then brings the list to me at the "store" and get all the materials the group has listed.  By doing this the group must think ahead and decided what will work best for the final project.  They also have to think about everything that is needed to complete the project, like glue or tape to hold the larger materials together or scissors to cut the materials.  In the ramp project specifically the students had to choose what materials would work best for a platform and a ramp.
      The "Design" stage is when the group actually builds the ramp or whatever the project maybe. Then they test it to see if their planning and design was successful.    In this case the ramps were successful if the car was able to be pushed from the platform and roll past at least 5 floor tiles.
                                            Success!
    
                                     
                           Needs Improvement :(


      If the design did not succeed, then the group must rethink and improve upon the original design. 


     As with most everything we do in out class, we always end with a writing.  Each student will write their own story about the project.